API Authorization at the Gateway with Apigee, Okta and OPA (Part 1)
API gateways have become a standard component in modern application architectures. The gateway exposes application APIs to the Internet and serves as a logical place to enforce policy.
This is a two-part series about enforcing API authorization policies in Apigee with Okta as the identity provider (IdP). This post shows how you can set up Apigee, Okta and Open Policy Agent (OPA) to work together, and the next post will dive into different policies you can write and enforce once you have this setup in place.
The application we will discuss is based on a hypothetical medical insurance provider, Acme Health Care. Acme Health Care provides a web application that helps members and healthcare providers interact to process insurance claims for medical procedures undergone by the members.
This application requires enforcing policies that restrict access to a member’s insurance claims by other members based on certain attributes such as their membership type (primary/secondary).
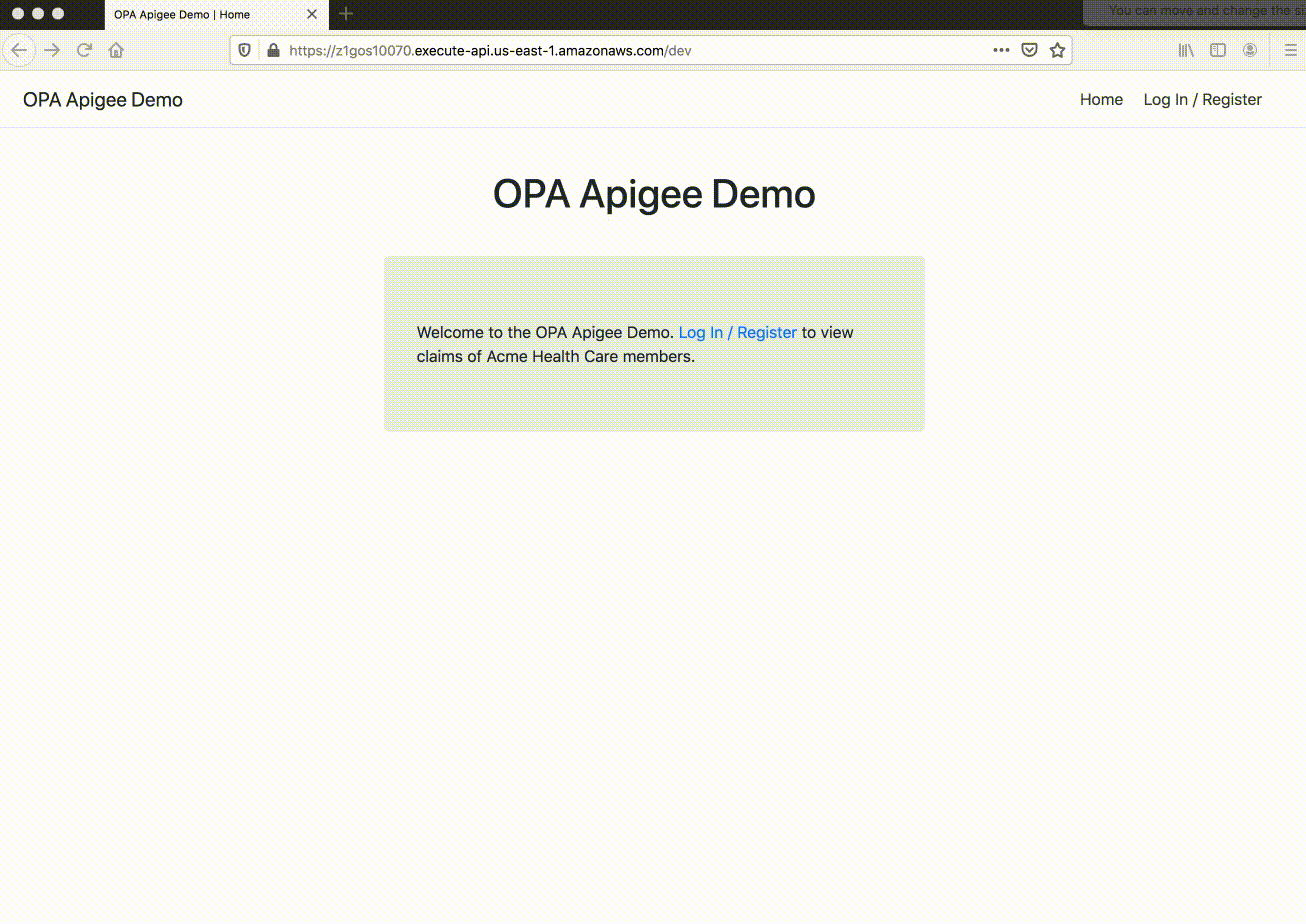
This isn’t a theoretical discussion—there’s working code you can try out for yourself and below you can see the OPA-Apigee demo in action!
Application architecture
To understand how these policies are enforced, we need to look at a bit of the application’s architecture. Acme Health Care stores insurance claims for each member in the Backend service and allows members to view them by logging into a web portal implemented by the Frontend service. The components of this application are described below.
- OPA
An open-source, general-purpose policy engine. OPA is used to authorize client requests received by Apigee as well as to filter the response sent back to the client.
- Apigee Edge
A platform for developing and managing APIs. By fronting services with a proxy layer, Edge provides an abstraction or facade for your backend service APIs. We will leverage Apigee’s Javascript Callout feature to query OPA for a policy decision. The call to OPA is executed within the context of an API proxy flow.
- Okta
We will use OpenId Connect for end-user authentication and Okta as our authorization server to store and manager user accounts.
- Frontend Service
Acme’s Frontend service allows a user to authenticate with Okta and then forwards the user request to Apigee. In the demo, this request is an API call to fetch a user’s insurance claims. In the sample code, the frontend service is a Python application that provides a landing page for users to register, login, logout etc. It is deployed on AWS Lambda using Zappa and is reachable at https://z1gos10070.execute-api.us-east-1.amazonaws.com/dev.
- Backend Service
A Python application that holds insurance claims. It is deployed on AWS Lambda using Zappa and is reachable at https://0gqq2bi3r3.execute-api.us-east-1.amazonaws.com/dev/.
Setup
This section provides a step-by-step guide on how to set up the different components of application architecture.
Okta
To get started with Okta, sign up for a free developer account and create an OpenID Connect application in Okta. To create a new application, browse to the Applications tab and click Add Applications.

Next, click the Web platform option and enter the following values on the settings page:
- Name: Simple Flask App
- Base URIs: https://z1gos10070.execute-api.us-east-1.amazonaws.com/dev
- Login redirect URIs: https://z1gos10070.execute-api.us-east-1.amazonaws.com/dev/oidc/callback
You can leave the other settings unchanged and click Done. Now that the application has been created, write down the Client ID and Client secret values on the following page. We’ll use these values in our Frontend service.
Now we’ll create an Okta API token that our Frontend service can use to authenticate requests to Okta APIs. To create an authentication token, click the API tab at the top of the page followed by the Create Token button. Copy down the token value once it’s created. Okta tokens are valid for 30 days from creation or last use. For more information on tokens can be found here.

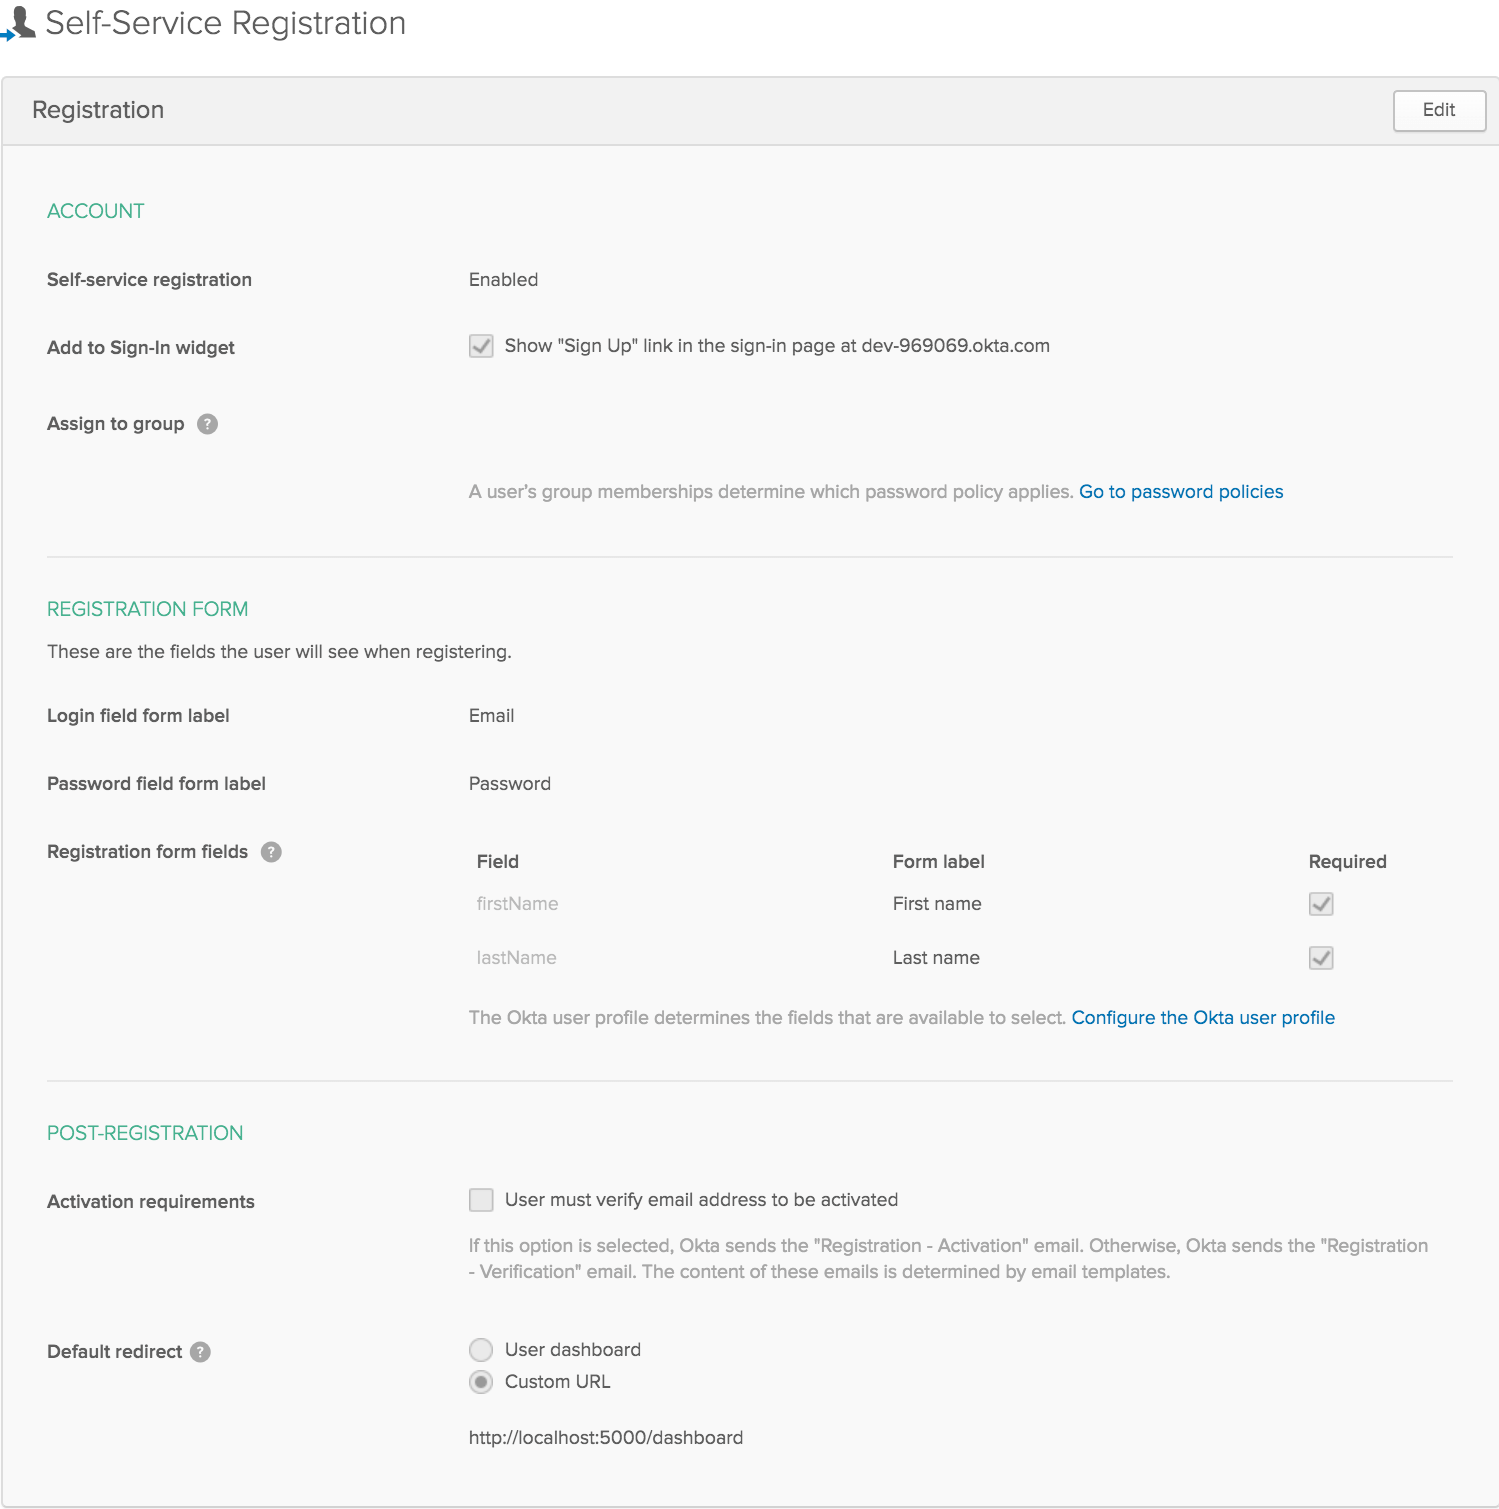
The last piece of the setup is to enable self-service registration, so that users can create accounts, log into them, reset passwords, etc. Go to Users tab and click Registration. The completed configuration settings should look like this:
Frontend service
We will now look at some of the settings that will enable our Frontend service to communicate with Okta to support actions such as user registration and login. Browse the Frontend service source code here and open the file client_secrets.json. The file looks like this:
| { “web”: { “client_id”: “”, “client_secret”: “”, “auth_uri”: “/oauth2/default/v1/authorize”, “token_uri”: “/oauth2/default/v1/token”, “issuer”: “/oauth2/default”, “userinfo_uri”: “/oauth2/default/userinfo”, “token_introspection_uri”: “/oauth2/default/v1/introspect”, “redirect_uris”: [ “https://z1gos10070.execute-api.us-east-1.amazonaws.com/dev/oidc/callback” ] } } |
In the above file, replace the placeholder variable with your actual Okta information obtained from the Okta set up. This file informs the Flask-OIDC library to use Okta for end-user authentication.
To configure the Flask-OIDC library, open main.py from the Frontend service source code and update the okta_client initialization by replacing and with the values from the Okta set up.
| okta_client = UsersClient(“”, “”) |
Apigee
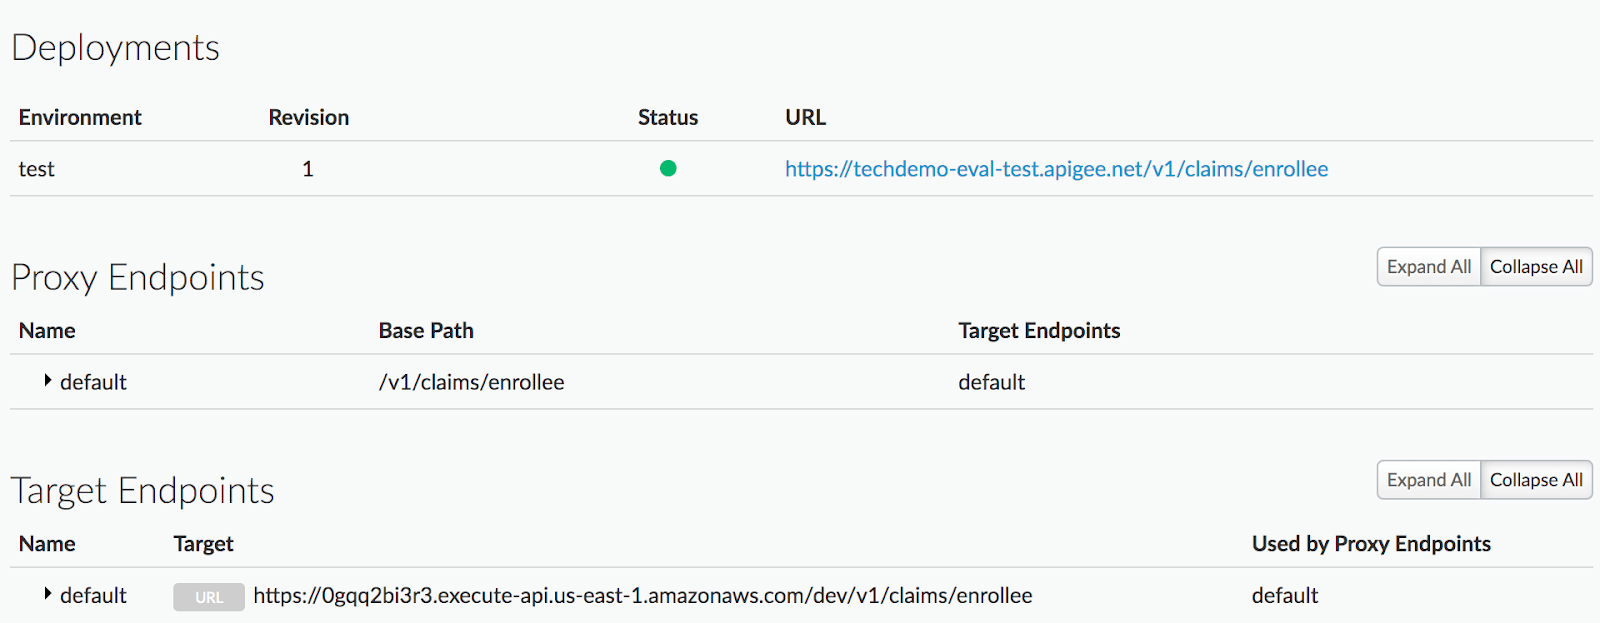
To get started, sign up for a free Apigee account. Next we will create a reverse API proxy to route traffic to our Backend service by clicking on API Proxies and then Reverse proxy. Our Backend service holds insurance claims and serves them by exposing an API endpoint named “/v1/claims/enrollee”. Apigee will front this API using the created proxy whose configuration should look like below:
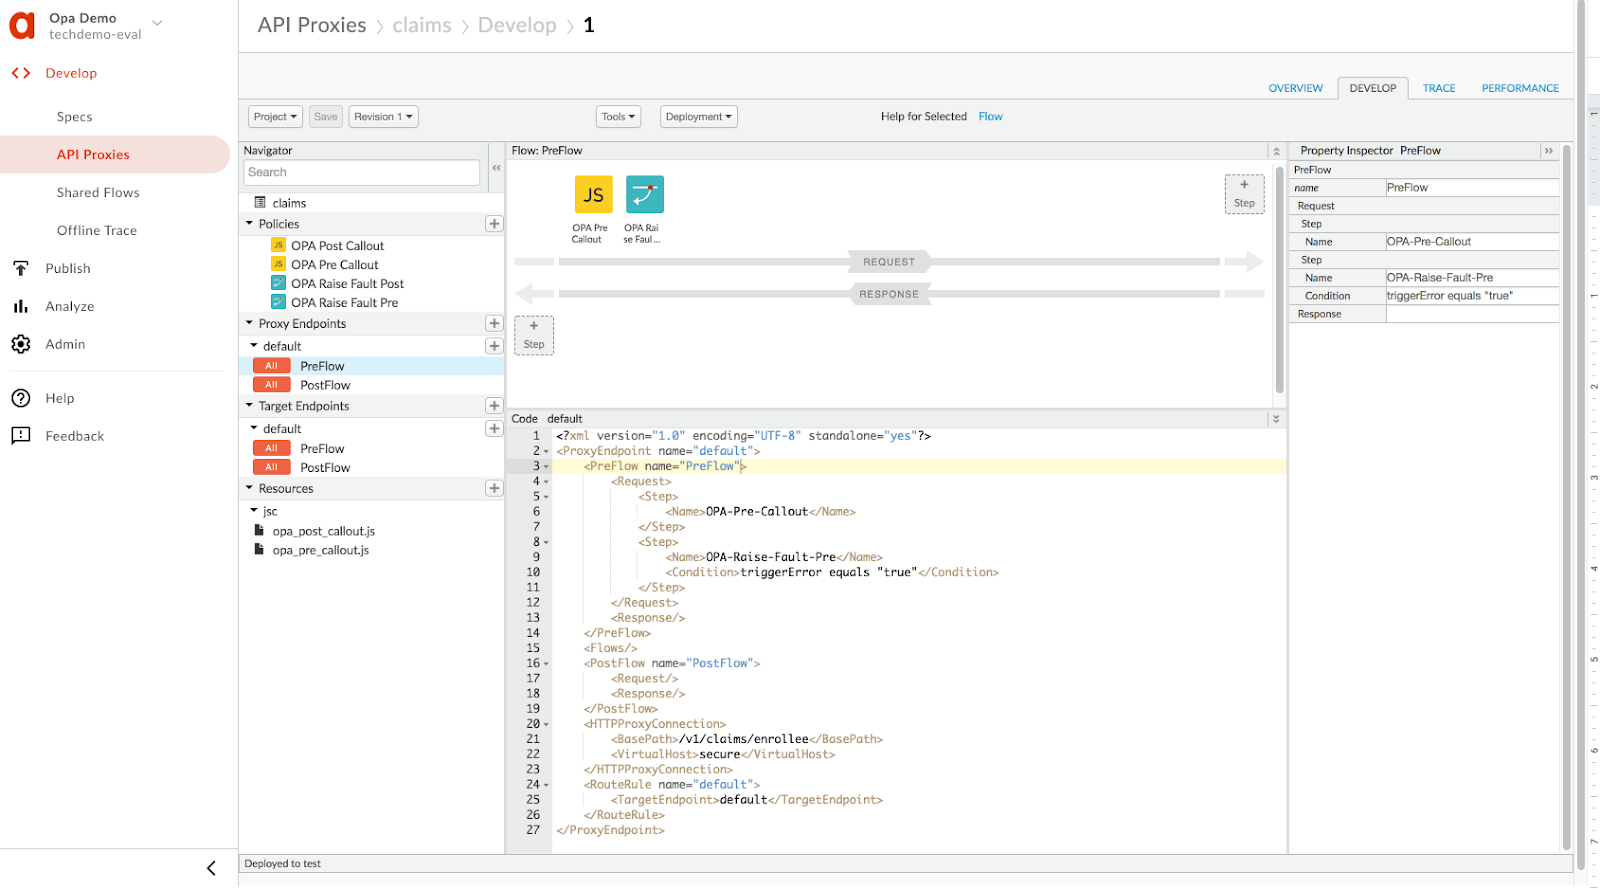
Next, we will leverage Apigee’s Javascript Callout feature to query OPA for a policy decision both in the request and response path. To create a JavaScript callout, select the Develop tab on the top of the page and click the “+” icon next to the Policies pane and select JavaScript.
Apigee also allows you to generate a custom fault response in response to an error condition using a RaiseFault policy. To create one, click the “+” icon next to the Policies pane and select Raise Fault.
You can use the Javascript and Raise Fault policy in a ProxyEndpoint/TargetEndpoint flow. Below is a snapshot of using the Javascript and Raise Fault policy in a ProxyEndpoint PreFlow:
Open Policy Agent
OPA is deployed on top of Kubernetes with the Rego policy stored in a ConfigMap. See this page for sample deployment manifests and for more information about running OPA on Kubernetes see this.
How it works
The components described in the previous sections work together to service an end-user request as detailed here:
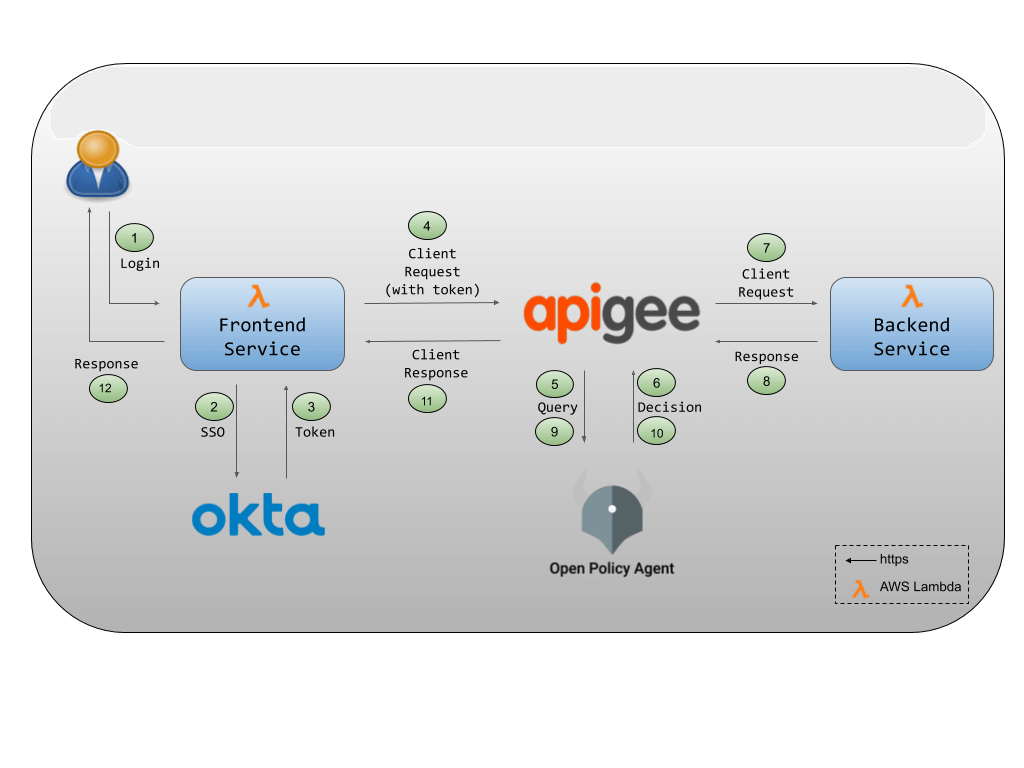
1. A member of Acme Health Care logs into the Frontend service to see insurance claims.
2. The Frontend service redirects the user to the Okta login page if there is no active session.
3. If the user logs in successfully, Okta issues a token to the user and sends it to the Frontend service.
4. The Frontend service forwards the user’s request for the protected resource to Apigee. This request includes the user’s token.
5. Apigee calls out to OPA to authorize the user request. It sends the method, resource path and token as input to OPA.
6. OPA evaluates Apigee’s query based on the policy and data loaded into it and sends a boolean policy decision back to Apigee for enforcement. The decision indicates whether the user’s request should be allowed or not.
7. If OPA denies the user request, Apigee sends a 403 http status code to the Frontend service and hence the user is not allowed to access the resource. If OPA allows the user request, Apigee forwards the request to the Backend service to fetch the protected resource (ie. insurance claims).
8. The Backend service sends the insurance claims to Apigee.
9. The insurance claims may contain some sensitive information which we may want to filter out before sending the response back to the client. Apigee now sends the insurance claims object to OPA to remove sensitive fields if any. As before, Apigee also sends the method, resource path and token as input to OPA.
10. Based on the policy and data, OPA evaluates the query and filters out fields in the original insurance claims object if needed. It then returns a policy decision in the form of either the original, or a filtered version of the insurance claims object back to Apigee.
11. Apigee sends this response to the Frontend service.
12. The Frontend service now presents this response to the logged in user.
Policy Enforcement
Policy enforcement is almost always done at the service that is receiving an API call. If instead policy is enforced at the client making the request, the client could neglect to check the authorization policy properly. On the other hand, policy is valuable at the client (e.g. in a web browser) to improve the usability of the application. For example, don’t show the user a clickable link on an insurance claim if the user is not authorized to read that claim.
Policy enforcement in this application is done at the Backend service. Apigee sits in front of Acme’s Backend service and makes the following callouts to OPA:
1. In the Request path — To authorize the incoming request, to check if the authenticated user is allowed to access the requested API.
2. In the Response path— To filter any sensitive fields in the response received from the Backend service, before the returning the response to the user.
In this series, we will focus on the policy enforcement in the request path. Every time Apigee receives an API request, it makes a HTTP call to OPA to check if the request should be allowed or denied. Based on the policy decision, it returns either a 200 (OK) or 403 (Forbidden) HTTP status code back to the client. The below code snippet shows how APIGEE processes the policy decision generated by OPA.
| function onComplete(response, error) { if (response) { // get the response object from the exchange with OPA var responseObj = response.content.asJSON; if (responseObj.error) { throw new Error(responseObj.error_description); } // get the HTTP status code from the response if (response.status >= 300) { // set the http response code context.setVariable(“error.status.code”, response.status); } if(responseObj.result) { print(“OPA allowed request”); } else { print(“OPA denied request”); // this condition will raise a fault and return a 403 context.setVariable(“triggerError”, “true”); } } else { throw new Error(error); } } |
Example policy
The request path exercises the below policy snippet. The allow rule returns true if an authenticated user with a valid token makes a GET API call to an endpoint that returns insurance claims for a user. To enable pattern-matching on the input path, it is represented as an array instead of a string.
| # rule to authorize incoming requests allow { # allow is assigned true if … is_token_valid # is_token_valid is true AND input.method == “GET” # method is “GET” AND input.path = [“v1”, “claims”, “enrollee”, enrolleeId] # path has the form [“v1”, “claims”, “enrollee”, enrolleeId] ie. “/v1/claims/enrollee/<some_enrollee_id>” token.payload.enrolleeId == enrolleeId } # helper rule to check if the user’s token is validis_token_valid { # is_token_valid is assigned true if … now := time.now_ns() / 1000000000 now < token.payload.exp # current time is less than token expiration time} |
What you notice in the rules is the use of a token that is generated by Okta which provides the user attributes that OPA uses to make a policy decision (Note: OPA can also be provided external data like user attributes in ways other than an authentication token, but JWTs are a common way of providing those attributes).
Wrap Up
This post walked through the setup of Apigee, Okta and OPA to enforce API authorization policies at the gateway layer. Check out the second post in the series to learn about the different kinds of policies you can write once everything is connected.
Resources
- Demo source code
- Prerequisites: a free Okta and Apigee Edge account.
- Demo setup slides